
 3D Video
 en
en
 Deutsch
 French
 Russian
 Spanish
 Portugues
 Japanese
 Korean
 Turkey
 Italy
Italy Poland
 Indonesia
 Arabic
 India
India Thailand
 Malaysia
 Filipino
 China
China Taiwan
 Vietnam
 Netherlands
 Sweden
 Norway
 Denmark
The 3D Video player is designed for displaying 3D media using active shutter 3D glasses on your computer. It allows you to configure your PC for watching 3D shows with maximum possible quality. If your PC display are fast enough, image will looks better than a 3D IMAX cinema.

You don't need to buy expensive equipment for enjoy 3D. Player successfully works on various computers and provides high quality image with minimal costs. Flexible driver software adjusts your computer parameters to achieve the best possible 3D quality.
You can use any glasses from the glasses compatible list. Before purchasing equipment, need check the player software. If 3D video plays smoothly and steadily, without small freezes or dropped frames, it means your computer has sufficient performance.
What should be added to PC:
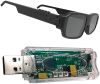
S3D Emitter synchroniser, or
NVIDIA Emitter synchroniser
Any Compatible 3D Glasses:
S3D Glasses bluetooth, or
3D IR Shutter glasses, or
DLP Link glasses, just $10 only
Demo Media files:
3D Art, Movies, Photo, Pictures
Avatar 'Fire and Ash' Trailer 3D
Use the player software to try watching videos and check performance on your devices. The player is still under active development and many features is not yet fully perfected. Creating a high-quality 3D player is a complex task, and we are improving it step by step.
3D Player Parameters
| Graphics driver | OpenGL 4.6 |
| Video engine | FFmpeg 8.0 "Huffman" |
| Video decoder | Vulkan Video |
| Operation System | Win10, Win11 |
| Display method | Switching Side |
| Display Frame Rate | 90 Fps.. 255 Fps |
| Preferred Frame Rate | 120.. 144 Fps |
| 3D Media Formats | SBS-X, SBS-P, L&R, T/B |
| 3D Video Formats | SBS, T/B, Compreseed |
| Type of 3D glasses | Active Shutter Glasses |
| Synchronization | USB cable, Bluetooth LE, IR Synchro |
| Compatibility | S3D Glasses S3D Emitter NVIDIA Emitter |
| Video Driver Type | NVIDIA Studio Driver |
Try using NVIDIA HotFix 581.94 But Microsoft unpredictable, it`s hard to say what they`ll mess up next. We do not guarantee the player operability on Win11.
You can purchase the high-quality S3D Kit at a discount: Emitter + Glasses.
The kit is ready to use right out of the box. The glasses connect via the emitter's Bluetooth.
Player Controls
Button: Play/Stop
Starts playback or stops playback and closes the file. Like all other players.Button: Pause/Resume
Temporary pause with image display. Press again to continue..Button: L/R
Switches the sequence of the Left/Right perspectives output, if stereo picture files are mixed up or grouped incorrectly.Button: 2D/3D
Choice between Stereo and Normal mode.Button: Format
3D video files have different methods of image packaging. First select Normal, see how the frames are arranged, then switch to the option you want.Button: Video
To show video or single image. Select single picture file or video file.Button: Image
To show multiple pictures or photos. Select the location of the directory with the image files. The slide show will automatically start.Button: Glasses
Opens the interface of the 3D Glasses Setup.Best Displays for 3D
RestrictionsTo achieve good image quality, your display should support a refresh rate of 90 FPS or higher. The player will work on older 75 Hz displays, but the resulting strong flicker will be severe, making 3D viewing hard. For the best 3D experience, we recommend using a modern gaming monitor with a pixel response time of 1-2 ms. Such displays produce a bright image with minimal ghosting and crosstalk (double contours). Be sure to check this specification in your monitor's documentation. If the pixel response time exceeds 3 ms, the quality of the 3D image may noticeably degrade.
Both fast pixel transitions from dark to bright and from bright to dark are equally important. Otherwise, the left and right stereo frames will optically blend together within the LCD panel because the pixels cannot switch states quickly enough. As a result, the images from both eyes will overlap, preventing proper stereoscopic separation. This defect cannot be corrected by adjusting the glasses.
It is also highly desirable for the display to support a global shutter refresh mode, where the entire panel is updated simultaneously rather than line by line. If the manufacturer implements frame updates too slowly, you may see, for example, the new left-eye image at the top of the screen while the bottom still displays the previous right-eye image. This type of scan-out overlap also degrades the 3D effect.
Finally, keep in mind that LCD panels are manufactured with different polarization orientations. Please refer to the S3D Glasses page before ordering your glasses to ensure you choose a model compatible with your display.
Champions of performance. Both fast pixel switching on and off are important - otherwise, stereo frames will optically mix within the display matrix, and proper 3D will not be achieved. This issue cannot be fixed by adjusting the glasses. Modern displays can reach frame rates above 500 fps. Pixel response times can be under 0.03 ms, for example, for the AG276QZD or FO27Q5P This performance is more than sufficient for 3D and should work perfectly.
Best Monitors: 120Hz, 144Hz, 240Hz
Image Setup
You can select the size of the player window and application will memorize it. The image will be automatically adjusted to fit the window. If the original size of the picture is larger than the size of the player window, the reduction will not spoil the image. But in most cases, the picture is smaller than the window and it needs to be enlarged. Choose the scaling method you like best.When switching to 3D mode, adjust the parameters of the picture rendering to compensate for the uneven absorption of different colors in the glasses. Display parameters can be set separately for normal and 3D mode. If the correction is disabled, it will not be applied to the image.
3D Image Formats
A single file is usually used to store two images, one for the left eye and one for the right. Authors often package the images however they want, without following any rules, to suit different viewing methods on various types of equipment. The player can display any format. To allow automatic detection of the packaging type, add an alphabetic ending code to the image filename. This code should be placed before the last dot in the filename. We will not add support for old anglif format. Its use is outdated and defies common sense. Files Packaging Codes table
• The parallel case example:
picture-file-name-p.jpg
Here: p - sbs stereo image, parallel
The left frame is placed and shown first.
sbs - word found in the file name will also be accepted as a parallel format
• The cross eye case example:
picture-file-name-x.jpg
Here: x - sbs stereo image, cross eye
The right frame is placed left and shown first.
cross - word found in the file name will also be accepted as a cross eye format
• The separate side files:
picture-file-name-l.jpg
picture-file-name-r.jpg
Here: l - left marking, r - right marking
Will be shown as a single 3D picture.
If you open a directory with many different images by Image button and then run slide show, the player selector will show only images files labelled for example: *p.jpg, *x.jpg, *l.jpg + *r.jpg
If the selector finds a stereo pair in separate files: filename-l.jpg + filename-r.jpg, it packs them into a single 3D frame and displays it as one image. If a file is unlabelled, it is shown as normal image.
Using the Image button you can open any picture file and then select stereo mode by menu Format. To disable automatic selection, switch the Format Auto Select checkbox to OFF.
3D Video Formats
Similarly with video files, they can be packaged however they want, without following format conventions. So please tag them as well according to the description below. So the player can start them correctly right away.1. Side By Side Normal

Two stereo frames placed together, L and R are side by side. They are not geometrically compressed. For this case use option: Side By Side Normal. Correspondingly add 2 letters to the vide file name before dot: -p or -x.
Where p - show the left picture first.
Or x - show the right picture first.
Example: video-file_p.mp4 or video-file-p.mp4
Here: p - parallel view SBS, left side first (uncompressed)
sbs - word found in the file name will also be accepted as a parallel view format
Example: video-file-x.mp4 or video-file_x.mp4
Here: x - cross view SBS, right side first, (uncompressed)
cross - word found in the file name will also be accepted as a cross eye format
2. Side By Side Compressed

Two stereo frames packed together, L and R are side by side. But geometrically compressed by horizontally. To get a normal image need to stretch it. Therefore, the horizontal (resolution) quality will be 2 times worse. The player will have to stretch the image and its quality will deteriorate. For this case use option: Side By Side Compressed. Correspondingly add 2 letters to the file name before dot: pc or xc.
Where p - show the first left picture.
Or x - show the first right picture.
Example: video-file-name pc.mp4
Here: p - parallel SBS, left side first, c - horizontally compressed
3. Top Bottom Compressed

Two stereo frames together, L on Top and R on Bottom position. Geometrically compressed vertically. To get a normal image need to stretch it vertically. Therefore, the vertical quality will be 2 times worse. For this case use option: Top Bottom Compressed. Correspondingly add 2 letters to the file name before dot: tc or bc.
Where t - show the top picture first (left).
Or b - show the bottom picture first (left).
The c - image is vertically compressed.
Example: video-file-name tc.mp4
4. Top Bottom Normal

Two stereo frames together, L and R are one on top of the other. They are not geometrically compressed. For this case use option: Top Bottom Normal. Correspondingly add 2 letters to the file name: -t or -b.
Where t - show the top picture first (left).
Or b - show the bottom picture first (left).
The image is vertically was not compressed.
Example: video-file-name -b.mp4
From the Format menu, you can select the desired format manually. Unlabelled files are shown as is as normal video.
How to attach equipment
Detailed description by model. Select the option you need.Connect S3D Glasses
Connect S3D Emitter
Connect S3D Dongle
Connect NVIDIA 3D Vision Glasses
Connect DLP Link Glasses
How to install
1. Download the zip archive with the player2. Unzip to a convenient location
3. Check the files with antivirus!
4. Download and install 3D emitter driver
5. Update graphic card OpenGL driver
6. Update the glasses and emitter firmware
7. In the video card driver enable vertical synchronization option
8. Download 3D demo video
9. Download 3D demo pictures
10. Run the playback and adjust the glasses
Possible problems
If the player crashes on startup or you see error messages. This situation in 90% of cases is caused by old OpenGL drivers of your video card. Install the OpenGL Extensions Viewer , it will show you the version of OpenGL supported by your video card and driver. The driver should be updated.
How to make a player faster
If you have a fast video card but the player runs inconsistently, frame loss or jerky images. It needs to be tuned for performance. The default driver configuration favours maximum compatibility and low power consumption over the highest rendering performance.NOTE: since May 2026 the classic "NVIDIA Control Panel" is retired for GeForce Game Ready / Studio drivers. All settings below now live in the NVIDIA App. Legacy 3D options (Anisotropic filtering, Antialiasing FXAA, PhysX GPU, etc.) are under "Show Legacy Settings".
Use a FIXED refresh rate - do NOT enable G-SYNC
Active shutter glasses must stay phase-locked to a stable refresh rate, so the display has to run at a fixed high refresh (typically 120 Hz). Variable-refresh technologies (G-SYNC / FreeSync / Adaptive Sync / VRR) are incompatible with shutter stereo — NVIDIA's own stack disables G-SYNC the moment stereoscopic 3D is turned on. Enabling G-SYNC here will only cause phase drift, crosstalk and flicker.
1. Windows Settings → Display → Advanced display → set refresh rate to 120 Hz (or the panel's native stereo rate).
2. NVIDIA App → Display → disable G-SYNC / VRR / Adaptive Sync for this display.
3. NVIDIA App → Graphics → set the driver to maximum performance (Power Management Mode → Prefer Maximum Performance).
NVIDIA App → Graphics → Global Settings (formerly Manage 3D Settings)
For a video player these knobs mostly free GPU headroom rather than speed up the pipeline. The three that actually matter are Power management mode, OpenGL rendering GPU (pick your discrete NVIDIA card — critical on Optimus laptops) and the fixed refresh above.
| Power management mode | Prefer maximum performance |
| OpenGL rendering GPU | Your NVIDIA GPU (e.g. GeForce RTX) |
| Monitor Technology | Fixed Refresh (NOT G-Sync) |
| Vertical sync | ON |
| Triple buffering (OpenGL) | ON |
| Preferred refresh rate | 120..144Hz |
| Low Latency Mode | On (DX9/11 only — minimal effect on the player) |
| Threaded optimization | Auto |
| Shader Cache Size | Driver Default (On) |
| OpenGL GDI compatibility (if present) | Prefer performance |
| Multi-display / mixed-GPU acceleration | Single display performance mode |
| Extension limit | OFF |
| Anisotropic filtering | OFF |
| Antialiasing (Mode) | OFF / Application-controlled |
| Texture filtering (quality) | High performance |
| Texture filtering (trilinear optimization) | ON |
| Texture filtering (anisotropic sample optimization) | ON |
| Texture filtering (negative LOD bias) | Clamp |
PhysX processor: Auto-select (has no effect on the player).
Once everything runs fast and without visible artefacts, you can raise the settings back toward higher quality to your liking.

Downloads
Lates version:
Player test samples
Windows drivers:
S3D Emitter driver
S3D Glasses driver
3D movies:
3D Macro Show
3D Aquarium
3D Video Trailers
3D Video Trailers
3D Video Trailers
3D Media List
3D pictures:
3D demo pack, cross view
3D demo pack, parallel view
Player test samples
Windows drivers:
S3D Emitter driver
S3D Glasses driver
3D movies:
3D Macro Show
3D Aquarium
3D Video Trailers
3D Video Trailers
3D Video Trailers
3D Media List
3D pictures:
3D demo pack, cross view
3D demo pack, parallel view
Homepage
Terms & Conditions
About Us
Privacy Policy
Business Info
Contacts
Payment
Shipping
Send Msg
Singapore 2026


