-
 en
en
Installing the S3D emitter driver
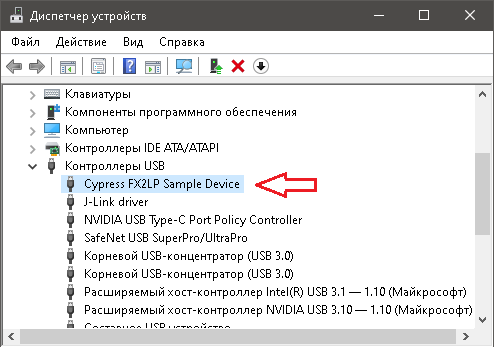
After installing the player, this item should be done first. If the emitter is not connected, you will not be able to synchronize your glasses and watch 3D.Download USB dongle driver
Open the zip archive and select CyUSB3.inf for your operating system.
Plug the device into the USB slot.
If the driver was installed successfully and the device is recognized by the system, the emitter appears in 'Device Manager' as: 'Cypress FX2LP Sample Device'
Open the S3D Player and press the "Settings" button.
In the menu you will see the presence of the dongle and its control panel. Open it and enable the transceivers by ticking the necessary items.

For Bluetooth glasses, turn on the RF transceiver.
Bluetooth Transmitter turn on - On
For Infrared controlled glasses, turn on the IR emitter.
Infrared Transmitter turn on - On
Setting the Emitter for Bluetooth glasses
Select the model of Bluetooth glasses and the transmitter power from the list.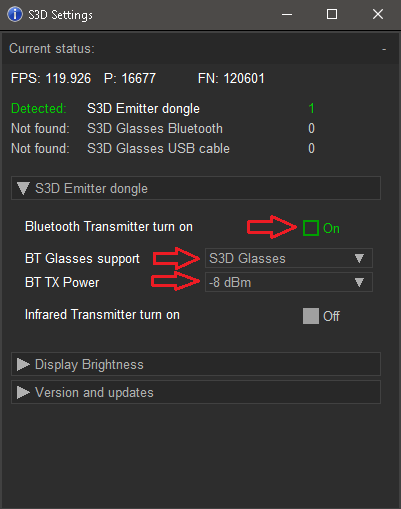
Selector: BT Glasses support
Selecting a model of glasses to connect:1. S3D Glasses
2.
3.
4.
* Function in improvement, not supported at the moment
Selector: BT TX Power
Selection of transmitter power.It is desirable to set a lower power, so as not to interfere with other devices. But if your connection is occasionally and the points "fall off", increase the BT TX Power level by 1-2 points.
Setting up the emitter for IR glasses
The emitter directly controls all models of infrared glasses, so the settings for them are made from this menu. Select from the list the model of the glasses and the transmitter power.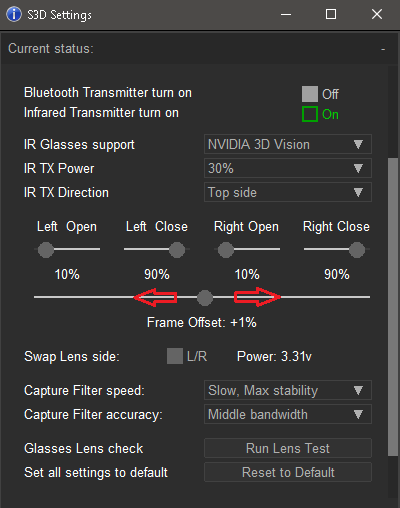
Selector: IR Glasses support
Selecting a model of glasses to connect:1. NVIDIA 3D Vision v1, v2
2. S3D Link
3. DLP Link
4. Sony
5. Sharp
6. Xpand
7. NuVision
8. Panasonic
9. Crystaleyes
10.Samsung 2007
11.Samsung 2010
12.ELSA H3D
Selector: IR TX Power
Selecting transmitter power.As with Bluetooth, you should choose a lower power setting so as not to interfere with other glasses and the dongle does not overheat. Overheating for long period of time can cause the IR LEDs to degenerate parameters. Do not overload them unnecessarily.
Selector: IR TX Direction
Switches the direction of the transmission vector. Allows you to change the service area and reduce interference with other devices. For example, if the dongle is facing to you with top side, select the 'Top side' setting and the transmitter will send the Sync signal through the top LED emitters. The direction of radiation is indicated by a flashing LED on the board.Slider: Left/Right Open/Close
Individually adjust the opening and closing times of the lenses. The displays have different and not equal pixel on and off times. By moving these sliders you can fine tune the glasses and remove the doubles and plumes. Slowly move them around and get the best quality.Slider: Frame Offset
Adjusts the offset of the picture. This control compensates for the delay time of the video signal in the player software, video card and display processor. This is the most important control because everyone's physical equipment is very different. Use this setting first. Make sure you have good image sharpness at the top and bottom of the frame. If this does not work, you should probably mix up the sides of the picture and switch the L/R checkbox on the player panel.CheckBox: Swap Lens side
In some instances of glasses, during production, the schinese confuse the connection of the lens wires. So that the polarity of the lenses always matches and you don't have to to disassemble the glasses for repair, just switch this flag.Indicator: Power
Shows the dongle power supply voltage. If the computer's USB connector contact is bad, the cable to the dongle is too long or of poor quality, The voltage monitor will report an error.Selector: Capture Filter speed
If your computer is slow, the video frame rate is unstable and jerky fluctuates. Try adjusting this filter, it changes the integration time of the frame detector. The faster the filter, the faster the glasses adjust to. But the stability of the image will be worse, and it will be smoother. It is difficult to recommend the right amount of adjustment beforehand because of the wide variation in computers from one company to another. Find the right setting for yourself.Selector: Capture Filter accuracy
The parameter sets the allowable amount of frame rate deviation. If your system is not loaded, select a 'Narrow Bandwidtch', for jitter not exceeding 4ms. If things are bad and your computer is 'slowing down' a lot, use 'Broad Bandwidth' capture. If you try to use a narrow bandwidth, but framerate drops too much, the glasses may not turn on, because they will ignore as an erroneous or interfering sync signal.Button: Run Lens Test
For a quick check of the performance of glasses lenses. Forced Enables the 'open-close' lens test.Button: Reset to Default
Press if the settings have been corrupted and you need to return to the factory settings.Synchronization output
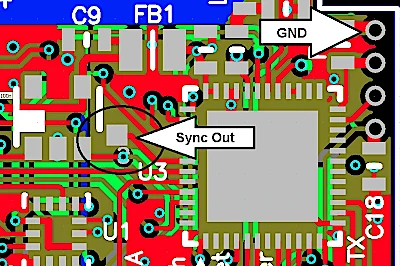
The PCB v4 version of the emitter provides an additional 3D synchronization output. The sync signal has a 50% duty cycle. This can be used, for example, with a Christie Mirage projector, which has a BNC input labeled "3D Sync." Several other projectors also support this capability. Be careful, the pin is directly connected to the chip without electrostatic protection. If you overload it, the chip may fail.
Quality limitations:
When using outdated and slow displays with response time The image flicker becomes quite noticeable, the flicker of the image becomes quite noticeable. The pixels don't have time to to switch quickly and show an average between the left or right picture, Therefore, the left and right perspectives optically "overlap," causing the appearance of doublings and plumes.Unfortunately, due to the imperfection of old equipment, it is not possible to eliminate this defect cannot be completely eliminated, and degrades the quality of the image. The shorter the response time of your monitor matrix, the better the 3D quality will be.
You can reduce distortion to a minimum, use a black desktop background. Darken the room and keep the light out of your eyes from extraneous sources. Do not set maximum the brightness and contrast, it slows down the display matrix.
If possible, switch and use a video card frame rate above 100fps. S3D glasses are fully adaptive and work at any refresh rate frame rate from 50 to 255fps.
How to choose the right monitor:
What is response time
LCD monitors
Technical support:
Bug reports:
IT support: S3D Facebook
Homepage
Terms & Conditions
About Us
Privacy Policy
Business Info
Contacts
Payment
Shipping
Send Msg
Singapore 2026


