en
en
 Deutsch
 French
 Russian
 Spanish
 Portugues
 Japanese
 Korean
 Turkey
 Italy
Italy Poland
 Indonesia
 Arabic
 India
India Thailand
 Malaysia
 Filipino
 China
China Taiwan
 Vietnam
 Netherlands
 Sweden
 Norway
 Denmark
S3D & WibbleWobble
In response to numerous requests from gamers, we are adapting our hardware and upgrading our drivers for full compatibility with the new WibbleWobble technology. The technology makes it possible to play modern games on PC in true stereoscopic 3D, even when the developers never provided such a mode. If you have a fast monitor and compatible equipment, enjoy a powerful and vivid gaming spectacle with WibbleWobble.WibbleWobble Core
Discord community
What it is
WibbleWobble turns an ordinary flat game into stereoscopic 3D with a "window into the world" view. Through head-motion tracking, you can look at the game as if it were the real world. You do not need have expensive special 3D monitors. The software and affordable 3D glasses do the real magic...Advantages
Access to a huge library of VR games from Steam that were previously unavailable on PC. They worked only on expensive VR headsets - the legendary Half-Life Alyx required an additional $1,200 worth of hardware. Our solution eliminates that requirement. Enjoy a high-quality stereoscopic 3D experience on large modern gaming displays. Smooth gameplay at 120+ FPS, a sharp and detailed image, and vibrant colors. Best of all, modern PC gaming displays offer excellent image quality while remaining affordable:The Best Monitors Overview
Choosing the Best Display for 3D
For the curious gamer
A popular-level description of the technology, how it is built and how it works. If you are not interested, there is no need to read it - it is dry material.
How a game draws 3D
The usual way to produce a 3D image in a game is to render the scene twice - separately for the left and right eye, virtually shifting the camera relative to the center of the scene. This is resource-expensive and requires built-in support from the game engine. Far from every game can do this. WibbleWobble offers two different paths, and the difference between them is fundamental - it determines both the image quality and the set of image artifacts.
Path one: ReShade Client - synthesizing stereo from a flat frame
The game renders a single ordinary view. The SuperDepth3D ReShade effect takes that frame together with the scene's depth buffer and reconstructs a second viewpoint from it by shifting pixels according to depth. The game engine knows nothing about stereo. This is cheap in terms of performance and works with almost any DX11/DX12 game. The trade-off is the artifacts inherent in the method itself. They are described below, in the "Disadvantages" sections.
Path two: OpenVR Client - true 3D rendering
WibbleWobble registers itself in SteamVR as a virtual VR headset. A VR-capable game, or one with a VR mod, renders the scene twice from two cameras separated by the interpupillary distance, exactly as a real headset does. IPD, per-eye resolution, and focal length are set in VR Config. Here WibbleWobble synthesizes nothing: it takes the ready-made stereo pair and outputs it to the screen frame-sequentially, synchronizing the shutter glasses. This costs more in performance, but the 3D geometry is absolutely correct. No holes along contours, no "cardboard" effect; each eye gets its own reflections and highlights. In essence, this is a way to play VR games on an ordinary monitor with 3D glasses but without a headset.
Reprojection - the field-of-view expansion mechanism
Reprojection works in both modes, including monocular. A high-performance shader takes the game frame and maps it onto the geometry of your workspace: onto a single monitor, or four monitors, or a curved screen. Through head-tracking (OpenTrack) the image shifts to follow your head, and the monitors begin to act as a window into a virtual world - the "VR fishtank" effect. The purpose of reprojection is to obtain the correct world scale and the correct field of view (FOV) for multi-monitor use. Reprojection can be turned off entirely (Client Config -> Reprojection: Disabled) and you can use only the stereo output, BFI, and the upscaler - the usual scenario for a single display.
* It has to be said that the project's author was overly optimistic about the idea of "expanding the world" across several panels. Even powerful graphics cards do not have enough performance for this. You will be lucky if the speed is enough for a single 4K display. It will not work with multiple displays...
FOV (Field of View): the viewing angle. It determines which sector of the world the virtual camera captures in the frame. It is measured in degrees, separately for the vertical and horizontal. A small FOV (40-50°) looks like a telephoto lens: a narrow sector with large objects. A large FOV (100-120°) is wide-angle, like an action camera. You see a lot to the sides, but the edges are stretched and objects appear farther away and smaller. This is a key parameter in WibbleWobble. The program must know the angle at which the game drew the frame in order to project it correctly onto your physical monitor. That is why Game Config has two fields, FOV Vertical and FOV Horizontal, with one requirement: the value must match the one set in the game itself. Change one value and the other is recalculated automatically to match the window's aspect ratio.
If the FOV is:
too large the world looks toy-like and the scale of objects is distorted
too low the world seems gigantic and everything looms over you
in 3D the depth breaks along with the scale, and eye strain sets in
Head-tracking as a "window into the world"
Using the OpenTrack method, the application handler tracks the position of the head and shifts the projection so that the monitor renders a virtual window into the 3D scene. This creates a parallax effect. When you move your head, the image shifts slightly, as if you were really looking through a window.
Frame-sequential stereo output
The application receives frames from the game at a variable rate as they become ready, "however they come." The client then adjusts the frame rate for playback at 60 Hz. The source of the stereo pair can be SuperDepth3D, a VR mod, or ready-made 3D content. WibbleWobble accepts it in side-by-side or checkerboard format (Client Config -> Source Format) and decodes it in FrameBufferDecode. The renderer then converts it into a 120 Hz frame-sequential stream while synchronizing the shutter glasses. The following emitters are supported: NVIDIA 3D Vision, Open3DOLED, DLP projectors, 3D Ready, and a homemade Arduino/VESA IR emitter.
Fighting motion blur and cross-talk
Motion blur is blur produced by the display. Modern LCD and OLED panels hold a pixel lit for the duration of the frame - the sample-and-hold mode. While the pixel stays lit and fixed in one position, the eyes instinctively keep following the moving object. As a result, the image "smears" on the retina itself, even though each individual frame on the display is perfectly sharp. The longer a pixel stays lit, the stronger the smear. The defect hides fine detail and additionally degrades the image in 3D mode.
To reduce the pixel's lit time, WibbleWobble provides two tools:
Black Frame Insertion - inserting a black frame between the useful ones (the Black Frame Insertion Interval parameter in Client Config).
CRT Beam Simulator by Blur Busters - a shader that imitates the sweep of a CRT's electron beam: it blanks the image line by line rather than as a whole frame. It gives a better result but is demanding of the display: it needs gamma 2.2 or 2.4, ABL/APL disabled, and OLED in SDR mode. On FALD and MiniLED panels it works poorly because of backlight inertia.
These two modes must not be enabled at the same time. When using CRT Sim, the Black Frame Insertion Interval parameter in Client Config must be zero. It is worth emphasizing separately that the game may run at a lower rate than the display outputs frames, and the program fills in the missing frames up to the display's rate. But this is not the generation of new intermediate images - it is a repeat of ready ones. In other words, there is none of the smoothness that a resampling method provides.
Cross-talk is the effect in which the image intended for one eye partially reaches the other eye. As a result, the viewer sees double contours or semi-transparent "ghosts" next to objects. This degrades the quality of the 3D image and reduces the sense of depth. To combat this, support for Black Frame Insertion and the Blur Busters CRT-beam simulator is built in. For comprehensive cross-talk suppression, a clever mode is used: the game image is drawn at 60 Hz, the glasses receive sync at 120 Hz, and output to the screen runs at 240 Hz with frame repetition.
A popular-level description of the technology, how it is built and how it works. If you are not interested, there is no need to read it - it is dry material.
How a game draws 3D
The usual way to produce a 3D image in a game is to render the scene twice - separately for the left and right eye, virtually shifting the camera relative to the center of the scene. This is resource-expensive and requires built-in support from the game engine. Far from every game can do this. WibbleWobble offers two different paths, and the difference between them is fundamental - it determines both the image quality and the set of image artifacts.
Path one: ReShade Client - synthesizing stereo from a flat frame
The game renders a single ordinary view. The SuperDepth3D ReShade effect takes that frame together with the scene's depth buffer and reconstructs a second viewpoint from it by shifting pixels according to depth. The game engine knows nothing about stereo. This is cheap in terms of performance and works with almost any DX11/DX12 game. The trade-off is the artifacts inherent in the method itself. They are described below, in the "Disadvantages" sections.
Path two: OpenVR Client - true 3D rendering
WibbleWobble registers itself in SteamVR as a virtual VR headset. A VR-capable game, or one with a VR mod, renders the scene twice from two cameras separated by the interpupillary distance, exactly as a real headset does. IPD, per-eye resolution, and focal length are set in VR Config. Here WibbleWobble synthesizes nothing: it takes the ready-made stereo pair and outputs it to the screen frame-sequentially, synchronizing the shutter glasses. This costs more in performance, but the 3D geometry is absolutely correct. No holes along contours, no "cardboard" effect; each eye gets its own reflections and highlights. In essence, this is a way to play VR games on an ordinary monitor with 3D glasses but without a headset.
Reprojection - the field-of-view expansion mechanism
Reprojection works in both modes, including monocular. A high-performance shader takes the game frame and maps it onto the geometry of your workspace: onto a single monitor, or four monitors, or a curved screen. Through head-tracking (OpenTrack) the image shifts to follow your head, and the monitors begin to act as a window into a virtual world - the "VR fishtank" effect. The purpose of reprojection is to obtain the correct world scale and the correct field of view (FOV) for multi-monitor use. Reprojection can be turned off entirely (Client Config -> Reprojection: Disabled) and you can use only the stereo output, BFI, and the upscaler - the usual scenario for a single display.
* It has to be said that the project's author was overly optimistic about the idea of "expanding the world" across several panels. Even powerful graphics cards do not have enough performance for this. You will be lucky if the speed is enough for a single 4K display. It will not work with multiple displays...
FOV (Field of View): the viewing angle. It determines which sector of the world the virtual camera captures in the frame. It is measured in degrees, separately for the vertical and horizontal. A small FOV (40-50°) looks like a telephoto lens: a narrow sector with large objects. A large FOV (100-120°) is wide-angle, like an action camera. You see a lot to the sides, but the edges are stretched and objects appear farther away and smaller. This is a key parameter in WibbleWobble. The program must know the angle at which the game drew the frame in order to project it correctly onto your physical monitor. That is why Game Config has two fields, FOV Vertical and FOV Horizontal, with one requirement: the value must match the one set in the game itself. Change one value and the other is recalculated automatically to match the window's aspect ratio.
If the FOV is:
too large the world looks toy-like and the scale of objects is distorted
too low the world seems gigantic and everything looms over you
in 3D the depth breaks along with the scale, and eye strain sets in
Head-tracking as a "window into the world"
Using the OpenTrack method, the application handler tracks the position of the head and shifts the projection so that the monitor renders a virtual window into the 3D scene. This creates a parallax effect. When you move your head, the image shifts slightly, as if you were really looking through a window.
Frame-sequential stereo output
The application receives frames from the game at a variable rate as they become ready, "however they come." The client then adjusts the frame rate for playback at 60 Hz. The source of the stereo pair can be SuperDepth3D, a VR mod, or ready-made 3D content. WibbleWobble accepts it in side-by-side or checkerboard format (Client Config -> Source Format) and decodes it in FrameBufferDecode. The renderer then converts it into a 120 Hz frame-sequential stream while synchronizing the shutter glasses. The following emitters are supported: NVIDIA 3D Vision, Open3DOLED, DLP projectors, 3D Ready, and a homemade Arduino/VESA IR emitter.
Fighting motion blur and cross-talk
Motion blur is blur produced by the display. Modern LCD and OLED panels hold a pixel lit for the duration of the frame - the sample-and-hold mode. While the pixel stays lit and fixed in one position, the eyes instinctively keep following the moving object. As a result, the image "smears" on the retina itself, even though each individual frame on the display is perfectly sharp. The longer a pixel stays lit, the stronger the smear. The defect hides fine detail and additionally degrades the image in 3D mode.
To reduce the pixel's lit time, WibbleWobble provides two tools:
Black Frame Insertion - inserting a black frame between the useful ones (the Black Frame Insertion Interval parameter in Client Config).
CRT Beam Simulator by Blur Busters - a shader that imitates the sweep of a CRT's electron beam: it blanks the image line by line rather than as a whole frame. It gives a better result but is demanding of the display: it needs gamma 2.2 or 2.4, ABL/APL disabled, and OLED in SDR mode. On FALD and MiniLED panels it works poorly because of backlight inertia.
These two modes must not be enabled at the same time. When using CRT Sim, the Black Frame Insertion Interval parameter in Client Config must be zero. It is worth emphasizing separately that the game may run at a lower rate than the display outputs frames, and the program fills in the missing frames up to the display's rate. But this is not the generation of new intermediate images - it is a repeat of ready ones. In other words, there is none of the smoothness that a resampling method provides.
Cross-talk is the effect in which the image intended for one eye partially reaches the other eye. As a result, the viewer sees double contours or semi-transparent "ghosts" next to objects. This degrades the quality of the 3D image and reduces the sense of depth. To combat this, support for Black Frame Insertion and the Blur Busters CRT-beam simulator is built in. For comprehensive cross-talk suppression, a clever mode is used: the game image is drawn at 60 Hz, the glasses receive sync at 120 Hz, and output to the screen runs at 240 Hz with frame repetition.
| Method | Purpose | 3D Source | Advantages | Disadvantages |
| ReShade Client | For DirectX 11 / 12 games | Depth Buffer + SuperDepth3D |
High compatibility Low GPU load No VR required |
Artifacts possible 3D quality depends on the game |
| OpenVR Client | VR games and games with VR mods | True stereo pair |
Perfect geometry Maximum 3D quality Correct reflections and lighting |
SteamVR required High GPU load |
Who uses WibbleWobble
Enthusiasts of stereoscopic 3D gaming, or owners of NVIDIA 3D Vision hardware officially discontinued by NVIDIA in 2019. Owners of 3D glasses and fast displays. The technology makes it possible to play modern games that have no built-in stereo support. It is an excellent solution in terms of price/quality - inexpensive and accessible to everyone. But image quality depends on the chosen method and the particular game. Read about the limitations below.Discovered issue and limitations
For all its merits, this method has limitations
that should be stated separately.
They stem not from any imperfection in the program but from the chosen operating principle.
The second stereo viewpoint is not rendered from the scene model but reconstructed
from an already finished frame and a depth map. If there is no data about what is hidden behind
foreground objects in the source frame, there is nowhere to recover it from.
Holes at object edges - disocclusion
This is the method's main defect. When the program shifts the viewpoint for the second eye or for a head turn, part of the background that was hidden by a foreground object's edge in the source frame should become visible. But no one rendered those pixels - they physically do not exist. The program has nothing to fill the gap with, so it either stretches the edge pixels, producing a "rubbery" smeared halo along the contours, or substitutes a "plausible" but usually incorrect patch. The stronger the viewpoint shift, the wider the halo bands. This is not an implementation bug but a limitation of the method itself: you cannot extract from a single image what is hidden behind objects and not visible in it.
Head movement amplifies the distortions
In ordinary stereo the distance between viewpoints is small and constant - equal to the distance between the pupils. But with a "window into the world," the head travels tens of centimeters in various directions, so the relative viewpoint shift is many times larger than the natural one, and the holes and smearing grow larger. It works out like this: sit still and there are almost no artifacts, but the 3D effect is weak too; move a lot and the effect is there, but everything along the edges of objects is smeared and floating.
The graphics rely on the depth map
The program needs correct information about the distance to every point in the scene. The game does not always provide it, or all of it. Transparent surfaces - water, glass, smoke, fire, foliage - usually have no detailed depth, or the engine does not create it at all. As a result, objects end up at the wrong distance: water sticks in the wrong place, smoke doubles, particles hang in the air in different spots. On top of that, not every game outputs a compatible depth buffer at all - in some it is inverted, in others it is protected and cannot be read.
Reflections and highlights break the most
Mirrors, water, wet asphalt, and metal are defined by the depth of their own surface, not by the image reflected in them. When the viewpoint shifts, the reflection drifts off to who knows where. If a highlight is "painted" onto the surface, it does not behave the way it should in the real world. It is precisely the most striking glossy content that looks flat and wrong in stereo.
Interface, crosshair, and HUD
Two-dimensional elements on top of the frame - health bars, menus, the crosshair - are drawn at zero depth, so after processing they end up at the wrong stereo distance. The interface either sticks into the screen or dangles in front of the scene. The crosshair is a headache of its own; its depth position almost always has to be adjusted by hand.
One frame for both eyes
Both eyes see the same image, just shifted. With honest stereo rendering each eye gets its own correct highlights, shadows, and refractions; here that will not happen. Because of this, objects appear as flat layers cut out of plywood and arranged by depth, rather than as volumetric bodies. In English-language material this effect is called the "cardboard cutout" effect.
Per-game tuning
The field of view, depth range, and convergence are set by hand for each game separately. A miss gives either eye strain from excessive convergence, or the wrong scale, where the world looks toy-like or gigantic, or even inverted depth altogether. This is a "tune it and figure it out" solution, not an "install it and play" one.
Latency and uneven frames
The game renders frames unevenly, and the client adapts them to the display's stable fps by repeating ready frames. The repetition itself introduces no distortion, but the latency between action and image accumulates: frame capture, processing, output. For head tracking, any such latency is felt as a "floating" of the scene. Game Config has a Frame Capture Delay parameter for this, to tune the capture moment.
Residual cross-talk and high monitor requirements
Software techniques - black frame insertion and the 60/120/240 mode - suppress ghosting, but do not remove it completely, because cross-talk is determined by many factors: the physics of the display panel and the glasses themselves. It depends on pixel response time, switching speed, the contrast of the glasses' lenses, and the screen's vertical draw rate. In addition, the most aggressive mode requires a fast 240 Hz panel with short pixel persistence, which not every user has. Unlike NVIDIA 3D Vision, ReShade does not reproduce a ready-made volume but synthesizes it from a flat frame. That is why holes along contours, incorrect reflections, and floating edges are stable artifacts of the method, not a temporary shortcoming.
Holes at object edges - disocclusion
This is the method's main defect. When the program shifts the viewpoint for the second eye or for a head turn, part of the background that was hidden by a foreground object's edge in the source frame should become visible. But no one rendered those pixels - they physically do not exist. The program has nothing to fill the gap with, so it either stretches the edge pixels, producing a "rubbery" smeared halo along the contours, or substitutes a "plausible" but usually incorrect patch. The stronger the viewpoint shift, the wider the halo bands. This is not an implementation bug but a limitation of the method itself: you cannot extract from a single image what is hidden behind objects and not visible in it.
Head movement amplifies the distortions
In ordinary stereo the distance between viewpoints is small and constant - equal to the distance between the pupils. But with a "window into the world," the head travels tens of centimeters in various directions, so the relative viewpoint shift is many times larger than the natural one, and the holes and smearing grow larger. It works out like this: sit still and there are almost no artifacts, but the 3D effect is weak too; move a lot and the effect is there, but everything along the edges of objects is smeared and floating.
The graphics rely on the depth map
The program needs correct information about the distance to every point in the scene. The game does not always provide it, or all of it. Transparent surfaces - water, glass, smoke, fire, foliage - usually have no detailed depth, or the engine does not create it at all. As a result, objects end up at the wrong distance: water sticks in the wrong place, smoke doubles, particles hang in the air in different spots. On top of that, not every game outputs a compatible depth buffer at all - in some it is inverted, in others it is protected and cannot be read.
Reflections and highlights break the most
Mirrors, water, wet asphalt, and metal are defined by the depth of their own surface, not by the image reflected in them. When the viewpoint shifts, the reflection drifts off to who knows where. If a highlight is "painted" onto the surface, it does not behave the way it should in the real world. It is precisely the most striking glossy content that looks flat and wrong in stereo.
Interface, crosshair, and HUD
Two-dimensional elements on top of the frame - health bars, menus, the crosshair - are drawn at zero depth, so after processing they end up at the wrong stereo distance. The interface either sticks into the screen or dangles in front of the scene. The crosshair is a headache of its own; its depth position almost always has to be adjusted by hand.
One frame for both eyes
Both eyes see the same image, just shifted. With honest stereo rendering each eye gets its own correct highlights, shadows, and refractions; here that will not happen. Because of this, objects appear as flat layers cut out of plywood and arranged by depth, rather than as volumetric bodies. In English-language material this effect is called the "cardboard cutout" effect.
Per-game tuning
The field of view, depth range, and convergence are set by hand for each game separately. A miss gives either eye strain from excessive convergence, or the wrong scale, where the world looks toy-like or gigantic, or even inverted depth altogether. This is a "tune it and figure it out" solution, not an "install it and play" one.
Latency and uneven frames
The game renders frames unevenly, and the client adapts them to the display's stable fps by repeating ready frames. The repetition itself introduces no distortion, but the latency between action and image accumulates: frame capture, processing, output. For head tracking, any such latency is felt as a "floating" of the scene. Game Config has a Frame Capture Delay parameter for this, to tune the capture moment.
Residual cross-talk and high monitor requirements
Software techniques - black frame insertion and the 60/120/240 mode - suppress ghosting, but do not remove it completely, because cross-talk is determined by many factors: the physics of the display panel and the glasses themselves. It depends on pixel response time, switching speed, the contrast of the glasses' lenses, and the screen's vertical draw rate. In addition, the most aggressive mode requires a fast 240 Hz panel with short pixel persistence, which not every user has. Unlike NVIDIA 3D Vision, ReShade does not reproduce a ready-made volume but synthesizes it from a flat frame. That is why holes along contours, incorrect reflections, and floating edges are stable artifacts of the method, not a temporary shortcoming.
The stereo geometry here is honest, and none of the image-synthesis artifacts - disocclusion, "cardboard,"
broken reflections - are present here. But this method has its own cost too, and it is a different one.
The game must support VR
This is the main limitation. The method does not work with an arbitrary game: it requires either built-in VR support or a VR mod. If no ready mod exists, the OpenVR path will not work, and only ReShade with all its artifacts remains. In other words, the broad compatibility for which the first path exists is completely lost here.
Double load on the graphics card
The scene really is rendered twice, from two cameras. There is none of the saving that reprojection of a single view provides: performance drops just as it does in real VR. This is partly compensated by the Resolution setting in VR Config - per-eye resolution can be lowered, and WibbleWobble will scale the image up to the display's resolution.
Complex installation
SteamVR must be installed. The driver is registered via Install.bat with administrator rights, after which two lines must be added manually to the config\steamvr.vrsettings file: "forcedDriver": "WibbleWobbleVR" and "activateMultipleDrivers": "true". Then complete Room Setup in STANDING ONLY mode. An error at any step and, instead of stereo, you get a black screen with no clear message about the cause.
Limitations of OpenVR itself
Some settings cannot be changed on the fly. If you change the resolution or the output rate, a restart of SteamVR is required. This is a platform limitation, not a program one, but it noticeably slows down tuning games.
Render optimization breaks some games
VR Config has an Optimise Single Eye parameter that allows rendering only one eye or both at half FOV. The project's author warns directly: the "Both" mode is the most problematic - vignetting and eye desynchronization are possible, and the image may "shift." In some games the optimization will have to be turned off entirely.
Fighting for window focus
Some games do not hand focus to the WibbleWobble interface: the SHIFT + END key combination does not fire, or the UI is drawn but cannot be controlled. You have to switch manually via ALT + TAB. A separate problem: the WibbleWobble window must not be closed - the program does not recover afterward, and the game will have to be restarted.
Recentering on every launch
Tracking must be centered manually (SHIFT + .) every time at startup, positioned exactly at the center of the working area in front of the screens. If the head was not there during centering, reprojection starts to behave strangely and the scale "drifts." By the author's own admission, hitting the correct position takes practice. This can later be fixed by using more intelligent tracking software.
Quirks of individual applications
Some programs work only with certain brands of headset. For them, VR Config has a Headset Identification parameter that makes WibbleWobble present itself as a different device - Vive, for example - without which head tracking does not work in DEOVR. In other words, compatibility in places rests on workarounds like these.
Common ground with the first path
Everything concerning the hardware holds for both methods: residual cross-talk, the requirement for a fast panel, the need for precise glasses synchronization. Stereo output, emitters, BFI, and CRT Sim work the same regardless of where the stereo pair came from.
The game must support VR
This is the main limitation. The method does not work with an arbitrary game: it requires either built-in VR support or a VR mod. If no ready mod exists, the OpenVR path will not work, and only ReShade with all its artifacts remains. In other words, the broad compatibility for which the first path exists is completely lost here.
Double load on the graphics card
The scene really is rendered twice, from two cameras. There is none of the saving that reprojection of a single view provides: performance drops just as it does in real VR. This is partly compensated by the Resolution setting in VR Config - per-eye resolution can be lowered, and WibbleWobble will scale the image up to the display's resolution.
Complex installation
SteamVR must be installed. The driver is registered via Install.bat with administrator rights, after which two lines must be added manually to the config\steamvr.vrsettings file: "forcedDriver": "WibbleWobbleVR" and "activateMultipleDrivers": "true". Then complete Room Setup in STANDING ONLY mode. An error at any step and, instead of stereo, you get a black screen with no clear message about the cause.
Limitations of OpenVR itself
Some settings cannot be changed on the fly. If you change the resolution or the output rate, a restart of SteamVR is required. This is a platform limitation, not a program one, but it noticeably slows down tuning games.
Render optimization breaks some games
VR Config has an Optimise Single Eye parameter that allows rendering only one eye or both at half FOV. The project's author warns directly: the "Both" mode is the most problematic - vignetting and eye desynchronization are possible, and the image may "shift." In some games the optimization will have to be turned off entirely.
Fighting for window focus
Some games do not hand focus to the WibbleWobble interface: the SHIFT + END key combination does not fire, or the UI is drawn but cannot be controlled. You have to switch manually via ALT + TAB. A separate problem: the WibbleWobble window must not be closed - the program does not recover afterward, and the game will have to be restarted.
Recentering on every launch
Tracking must be centered manually (SHIFT + .) every time at startup, positioned exactly at the center of the working area in front of the screens. If the head was not there during centering, reprojection starts to behave strangely and the scale "drifts." By the author's own admission, hitting the correct position takes practice. This can later be fixed by using more intelligent tracking software.
Quirks of individual applications
Some programs work only with certain brands of headset. For them, VR Config has a Headset Identification parameter that makes WibbleWobble present itself as a different device - Vive, for example - without which head tracking does not work in DEOVR. In other words, compatibility in places rests on workarounds like these.
Common ground with the first path
Everything concerning the hardware holds for both methods: residual cross-talk, the requirement for a fast panel, the need for precise glasses synchronization. Stereo output, emitters, BFI, and CRT Sim work the same regardless of where the stereo pair came from.
A common problem
The complexity of configuration and of preparing to launch. To try WibbleWobble out, you have to spend a considerable amount of time studying the documentation and performing various small operations. It took us a couple of days to sort it out before we managed to start without errors. The author ignored unprepared users and chose not to make a one-button auto-configurator. It is precisely the launch complexity that drives away a significant portion of potential users.
Subjective quality assessment
The project uses various ways to compensate for graphics defects. See the table of measures taken and the approximate subjective gain in 3D quality, as a percentage relative to panels without compensation. The assessment is based on visual tests and is not the result of laboratory measurements.What actually delivers a gain:
Line-by-line image correction to compensate for the panel's draw latency, which reduces crosstalk several-fold. Precise measurement of OLED latency for each display model and individual tuning of the moment the glasses' shutters open and close. Precise glasses synchronization with no dropped or repeated frames. Suppression of sync jitter - any jitter over a hundred microseconds is immediately noticeable in active 3D. Temporal pre-compensation of the image, if the response function of the specific panel is known. This is exactly what manufacturers of professional VR headsets do to improve quality.
| CRTSim | +15% |
| Standard BFI | +30% |
| Panel draw compensation | +50% |
| Precise glasses synchronization | +50% |
| High fps (240-480 Hz) | +100% |
WibbleWobble technology delivers something an ordinary 3D player does not: head-motion tracking and a live "window into the world" effect. Our driver implementation makes it possible to obtain the most spectacular 3D possible, thanks to the outstanding speed characteristics of the emitter and glasses and to quality software.
Choose: ReShade.. OpenVR..
| Want to play games in 3D? | ReShade Client |
| Have a VR game or VR mod? | OpenVR Client |
| Just want the "window into the world" effect? | Mono + Reprojection |
The kit is ready to use right out of the box.
 Attention: from here on, check all downloaded files
with an antivirus!
Attention: from here on, check all downloaded files
with an antivirus!

Installing the software
Step 1. Update the graphics card driver
The video player used the NVIDIA Studio Driver; for games it must be replaced with the GeForce Game Ready Driver
NVIDIA drivers
Install it and, from the NVIDIA App, reconfigure the graphics card for maximum performance, as described in Step 7.
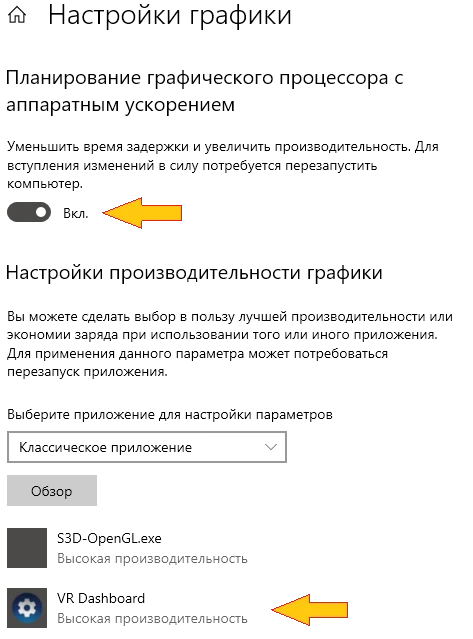
In Windows settings, go to > Settings > Graphics settings. Enable the scheduler policy: Increase performance. Add SteamVR to the priority group: High performance.
Step 2. Install the emitter driver
Use the 3D Vision emitter or the S3D emitter
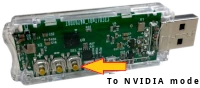
The same compatible, digitally signed original driver suits both devices. The S3D emitter must be switched to NVIDIA mode by pressing and holding the last button for about a couple of seconds.
NVIDIA 3D Controller driver
Install it and verify success in "Device Manager": with the emitter connected, the device name appears without a yellow error triangle. Do not connect two emitters to the PC at once! WibbleWobble can work with only one instance. See the installation steps in the NVIDIA Gaming section.
Step 3. Download and unpack WibbleWobble
Go to the Releases page on GitHub. Download the latest version and extract it into a convenient folder. Choose the folder in a permanent location - it cannot be moved after the application is registered. The folder path must be written without spaces and using Latin letters only.
Step 4. Common registration in the system
We register the WibbleWobble files and COM components in the system so that Windows knows where the application is located. This is needed by both clients, ReShade and OpenVR. Go to the WibbleWobbleClient folder. Right-click the Register.bat file and select "Run as administrator". Let it finish; a black console window will open with a message about the result.
Step 5. Prepare Windows
A mandatory item - without it the image will break: disable screen scaling in Windows settings. Display > Scale > set 100%.
Step 6. Disable GPU Tweak 3 and similar ASUS utilities if they are installed. They introduce latency and cause the image to stutter, spoiling the 3D.
Step 7. Configure the display and graphics card
Disable all displays except the primary one!
1. NVIDIA 3D stereo - off
2. G-Sync - off
3. Monitor - set as primary
4. Monitor FPS - 120 Hz
5. Low Latency Mode - Ultra
6. Power Management - Prefer Maximum Performance
7. Vertical Sync - Use the 3D application setting
8. Max Frame Rate - 120 Hz
Step 8. Load a test game
For convenience we will use the free benchmark Superposition. It can be used to test both clients.
The video player used the NVIDIA Studio Driver; for games it must be replaced with the GeForce Game Ready Driver
NVIDIA drivers
Install it and, from the NVIDIA App, reconfigure the graphics card for maximum performance, as described in Step 7.
In Windows settings, go to > Settings > Graphics settings. Enable the scheduler policy: Increase performance. Add SteamVR to the priority group: High performance.
Step 2. Install the emitter driver
Use the 3D Vision emitter or the S3D emitter
The same compatible, digitally signed original driver suits both devices. The S3D emitter must be switched to NVIDIA mode by pressing and holding the last button for about a couple of seconds.
NVIDIA 3D Controller driver
Install it and verify success in "Device Manager": with the emitter connected, the device name appears without a yellow error triangle. Do not connect two emitters to the PC at once! WibbleWobble can work with only one instance. See the installation steps in the NVIDIA Gaming section.
Step 3. Download and unpack WibbleWobble
Go to the Releases page on GitHub. Download the latest version and extract it into a convenient folder. Choose the folder in a permanent location - it cannot be moved after the application is registered. The folder path must be written without spaces and using Latin letters only.
Step 4. Common registration in the system
We register the WibbleWobble files and COM components in the system so that Windows knows where the application is located. This is needed by both clients, ReShade and OpenVR. Go to the WibbleWobbleClient folder. Right-click the Register.bat file and select "Run as administrator". Let it finish; a black console window will open with a message about the result.
Step 5. Prepare Windows
A mandatory item - without it the image will break: disable screen scaling in Windows settings. Display > Scale > set 100%.
Step 6. Disable GPU Tweak 3 and similar ASUS utilities if they are installed. They introduce latency and cause the image to stutter, spoiling the 3D.
Step 7. Configure the display and graphics card
Disable all displays except the primary one!
1. NVIDIA 3D stereo - off
2. G-Sync - off
3. Monitor - set as primary
4. Monitor FPS - 120 Hz
5. Low Latency Mode - Ultra
6. Power Management - Prefer Maximum Performance
7. Vertical Sync - Use the 3D application setting
8. Max Frame Rate - 120 Hz
Step 8. Load a test game
For convenience we will use the free benchmark Superposition. It can be used to test both clients.

Case: OpenVR Client
Step 1. Install SteamVR
from Steam. It is free.

Step 2. Add the OpenVR client driver to SteamVR
Open the WibbleWobble -> WibbleWobbleVR folder. Inside it there is another WibbleWobbleVR folder. It must be copied into: \Steam \steamapps \common \SteamVR \drivers - that is the driver installation.
Step 3. Disable SteamVR Home
So that on startup Steam does not launch its own 3D environment and capture the screen, add the following in the config\steamvr.vrsettings file, in the "steamvr" section: "enableHomeApp" : false, SteamVR must be fully closed while doing this; check for vrmonitor.exe and vrserver.exe in Task Manager.
Step 4. Launch the test game
Open Superposition by clicking the desktop icon. To display through the OpenVR Client, select:
Virtual Reality
Graphics API - DirectX
VR Headset - SteamVR
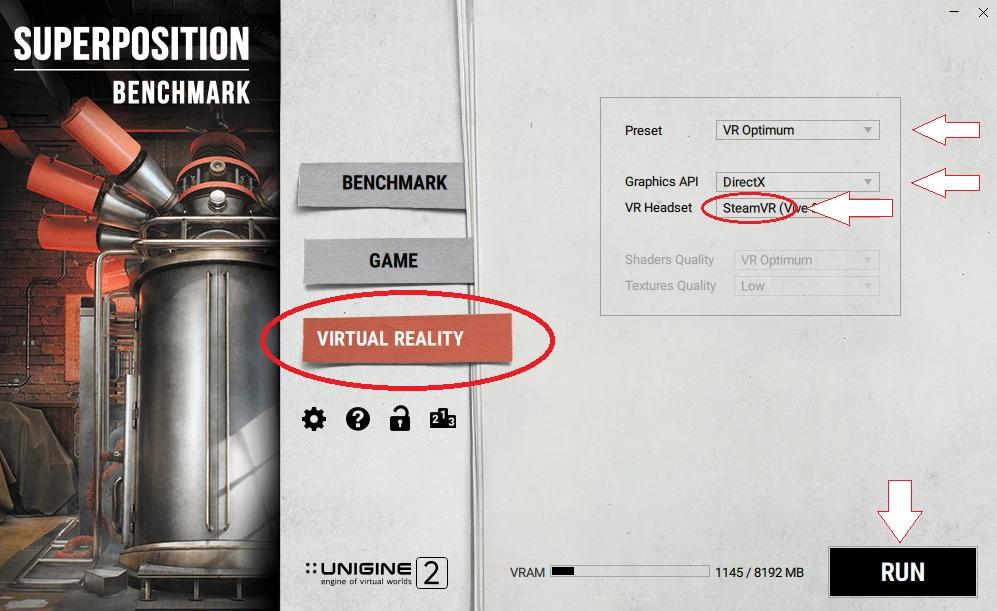
If everything was done correctly and SteamVR read the config, it should immediately show the control interface image with a "headset-like" view. But for us this does not happen. Any calls to the WibbleWobble interface from the keyboard do nothing. The mouse has dropped out and control does not work. Enabling the emitter or doing anything further is impossible...
At this point you should reboot the computer!
It helped. After the reboot and a fresh launch of Superposition, the control interface appeared and the mouse started working. Two viewpoints of the game are shown. They are indeed rendered in 3D. The emitter turned on, and now the fine graphics tuning can be done.
Step 5. Graphics display configuration
Press SHIFT + END to open the WibbleWobble interface. Go to the Game Config menu item. Set a convenient size for the game window on the display and the "world" viewing angles as you like. Do not make them too large; aim for the image to look natural. After changing any parameter, press Enter and Save, otherwise the client will not remember the settings and you will have to redo them.
Step 6. Enable 3D synchronization
Go to Emitter Config: enable the NVIDIA 3D emitter with the checkbox. Set Sync Rate HZ according to the hint at the top of the window. The emitter's LED should turn bright green. Press the power button on the glasses and check whether stereo has appeared.
Step 7. Adjust synchronization
If the glasses turned on but there is no stereo / or it doubles / flickers / the viewpoints are swapped:
Adjust Sync Offset Microseconds - the phase at which the glasses open. Tune Open Duration Microseconds - the duration the lenses stay open. Set the parameter lower than the Sync Rate duration (the value is shown at the top of the window), otherwise stereo will disappear. Goal: obtain minimum doubling (cross-talk). The left-eye image should not leak significantly into the right. Later we will attach an optimized configuration file with all the parameters.
Impressions of the OpenVR Client
The 3D quality is very good! The depth of the scenes is stunning, geometrically correct, without the defects inherent in conversion and without the lens distortion of headsets. Everything is even, clean, sharp, and looks like the real world. But there is cross-talk (ghosting), roughly estimated at ~1%. We were not able to tune the glasses' synchronization parameters precisely by hand. To get close to the ideal, you have to adjust many settings in different dialogs at once, by hand. It is a difficult task, especially in dynamic scenes. An automatic optimizer will have to be added, which we will do soon.
Overall - the impressions are very positive...
from Steam. It is free.
Step 2. Add the OpenVR client driver to SteamVR
Open the WibbleWobble -> WibbleWobbleVR folder. Inside it there is another WibbleWobbleVR folder. It must be copied into: \Steam \steamapps \common \SteamVR \drivers - that is the driver installation.
Step 3. Disable SteamVR Home
So that on startup Steam does not launch its own 3D environment and capture the screen, add the following in the config\steamvr.vrsettings file, in the "steamvr" section: "enableHomeApp" : false, SteamVR must be fully closed while doing this; check for vrmonitor.exe and vrserver.exe in Task Manager.
Step 4. Launch the test game
Open Superposition by clicking the desktop icon. To display through the OpenVR Client, select:
Virtual Reality
Graphics API - DirectX
VR Headset - SteamVR
If everything was done correctly and SteamVR read the config, it should immediately show the control interface image with a "headset-like" view. But for us this does not happen. Any calls to the WibbleWobble interface from the keyboard do nothing. The mouse has dropped out and control does not work. Enabling the emitter or doing anything further is impossible...
At this point you should reboot the computer!
It helped. After the reboot and a fresh launch of Superposition, the control interface appeared and the mouse started working. Two viewpoints of the game are shown. They are indeed rendered in 3D. The emitter turned on, and now the fine graphics tuning can be done.
Step 5. Graphics display configuration
Press SHIFT + END to open the WibbleWobble interface. Go to the Game Config menu item. Set a convenient size for the game window on the display and the "world" viewing angles as you like. Do not make them too large; aim for the image to look natural. After changing any parameter, press Enter and Save, otherwise the client will not remember the settings and you will have to redo them.
Step 6. Enable 3D synchronization
Go to Emitter Config: enable the NVIDIA 3D emitter with the checkbox. Set Sync Rate HZ according to the hint at the top of the window. The emitter's LED should turn bright green. Press the power button on the glasses and check whether stereo has appeared.
Step 7. Adjust synchronization
If the glasses turned on but there is no stereo / or it doubles / flickers / the viewpoints are swapped:
Adjust Sync Offset Microseconds - the phase at which the glasses open. Tune Open Duration Microseconds - the duration the lenses stay open. Set the parameter lower than the Sync Rate duration (the value is shown at the top of the window), otherwise stereo will disappear. Goal: obtain minimum doubling (cross-talk). The left-eye image should not leak significantly into the right. Later we will attach an optimized configuration file with all the parameters.
Impressions of the OpenVR Client
The 3D quality is very good! The depth of the scenes is stunning, geometrically correct, without the defects inherent in conversion and without the lens distortion of headsets. Everything is even, clean, sharp, and looks like the real world. But there is cross-talk (ghosting), roughly estimated at ~1%. We were not able to tune the glasses' synchronization parameters precisely by hand. To get close to the ideal, you have to adjust many settings in different dialogs at once, by hand. It is a difficult task, especially in dynamic scenes. An automatic optimizer will have to be added, which we will do soon.
Overall - the impressions are very positive...
Next, we will try connecting older games built on DirectX 9, 10 through the ReShade client. This is considerably harder, so we will not rush.
To be continued - check back later...
Homepage
Terms & Conditions
About Us
Privacy Policy
Business Info
Contacts
Payment
Shipping
Send Msg
 S3D
S3DSingapore 2026