
 en
 Deutsch
 French
 Russian
 Spanish
 Portugues
 Japanese
 Korean
 Turkey
 Italy
 Poland
 Indonesia
 Arabic
 India
 Thailand
 Malaysia
 Filipino
 China
 Taiwan
 Vietnam
 Netherlands
 Sweden
 Norway
 Denmark
Adding Pictures
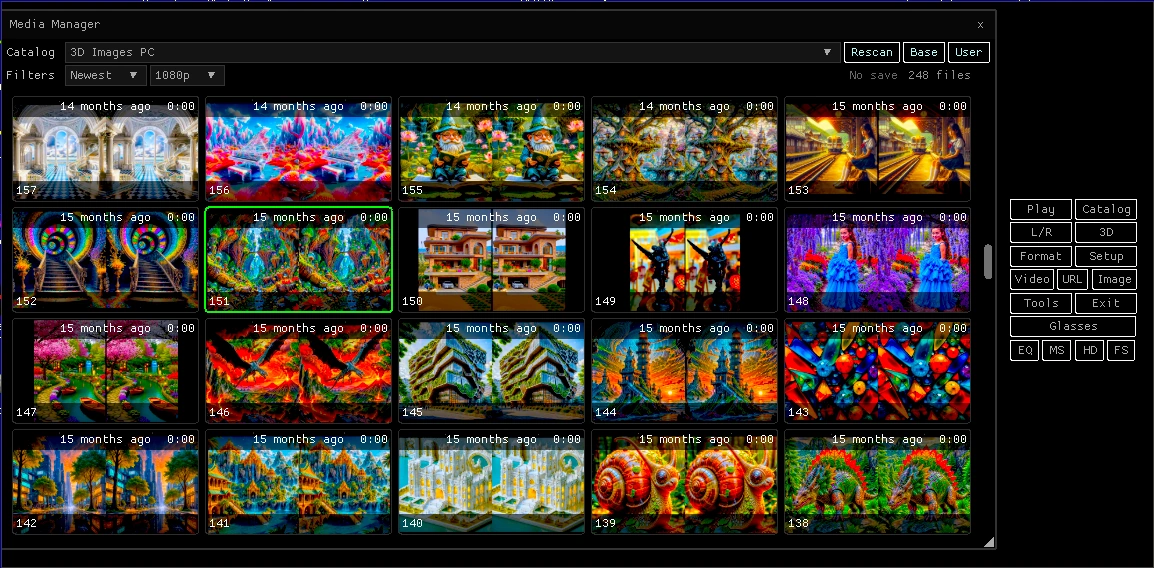
The Catalog button in S3D Player opens the Media Manager. Besides videos, it can show 3D photos and ordinary pictures: you select a gallery from the list, scroll through the preview cards and start a slide show with a single click. A gallery can be a folder on your computer, your own password-protected server or Cloudflare R2 cloud storage. Picture galleries are added in the same text files as videos.
Formats
JPG, PNG, BMP, WEBP, AVIF, GIF and the stereo formats MPO (3D cameras) and HEIC (3D capture on smartphones). For 3D pictures stored in a single image (SBS, Top/Bottom), the player recognizes the layout from the file name or with its format detector.
Connection methods
The player supports four types of picture sources. They can be combined with video sources in the same catalog.| Method | Where the pictures are | What you need | Saving to disk |
| Local folder | On your computer | Only the folder path | The files are already on your PC |
| Your own server | On your web hosting | Hosting with PHP, our code package | If the server allows it |
| Cloudflare R2 | In Cloudflare R2 cloud storage | A Cloudflare account and a read-only key. No hosting required | Set by the config.txt file in the bucket |
| Public gallery | On any website | An index.txt file listing the pictures | Set by a line in index.txt |
Catalog configuration
Galleries are described in the same files as videos: catalog-base.txt (provided by us and replaced by player updates) and catalog-user.txt (yours, never modified by updates). Both are located in the player folder plugins\catalog\ and can be opened with the Base and User buttons in the Media Manager window. The file format and the general settings are described on the page about adding video.A picture section differs from a video section by a single key: instead of path or url it uses images. This key tells the player to show pictures rather than videos.
[My 3D photos]
images = D:\Photo\3D

Method 1: a folder on your computer
The simplest method. The player scans the folder each time the gallery is selected,
so new files appear in the list right away.
Step 1. Open catalog-user.txt
In the Media Manager window, click the User button.
Step 2. Add a section
recursive = 1: include subfolders as well. Without this line only the folder itself is scanned.
Step 3. Save the file
Select the new gallery in the source list. If the folder does not exist, the window shows Folder not found.
Step 1. Open catalog-user.txt
In the Media Manager window, click the User button.
Step 2. Add a section
[My 3D photos] images = D:\Photo\3D recursive = 1images: the full path to the folder with pictures.
recursive = 1: include subfolders as well. Without this line only the folder itself is scanned.
Step 3. Save the file
Select the new gallery in the source list. If the folder does not exist, the window shows Folder not found.
Method 2: a private gallery on your web hosting
For those who want to show their own 3D photos to friends, clients or their audience.
The pictures are stored on your web hosting, one folder per gallery. The player gets the
list and the pictures themselves only with a login and password. You decide which galleries
each user can see and who is allowed to save pictures.
Try the demo, it is already included in the player: S3D demo server images, gallery: Mix1, Mix2
What you need
An ordinary inexpensive hosting plan with PHP and Apache 2.4 (.htaccess support).
Code package: your own picture server
Step 1. Upload the package to your hosting
Unpack the archive and copy the folder to your hosting, for example to /imgshow/. Inside its galleries folder, create one folder per gallery, for example mix1, mix2, and put the pictures into them. The .htaccess files of the package block direct access to the pictures: they can only be obtained through the player with a password.
Step 2. Configure config.php and open the admin panel
In config.php, set the initial admin password and your own admin page file name, then rename admin.php to that name. In the admin panel, add users with passwords and set for each:
save: whether the user may save pictures.
galleries: which galleries (folders) the user can see: * for all, or names such as mix1,mix2.
The panel also shows all galleries and pictures, user activity and failed logins. Step by step instructions are included in the package (README.txt).
Step 3. Test the server
In the Windows command prompt:
Step 4. Add the gallery to the player
What you need
An ordinary inexpensive hosting plan with PHP and Apache 2.4 (.htaccess support).
Code package: your own picture server
Step 1. Upload the package to your hosting
Unpack the archive and copy the folder to your hosting, for example to /imgshow/. Inside its galleries folder, create one folder per gallery, for example mix1, mix2, and put the pictures into them. The .htaccess files of the package block direct access to the pictures: they can only be obtained through the player with a password.
Step 2. Configure config.php and open the admin panel
In config.php, set the initial admin password and your own admin page file name, then rename admin.php to that name. In the admin panel, add users with passwords and set for each:
save: whether the user may save pictures.
galleries: which galleries (folders) the user can see: * for all, or names such as mix1,mix2.
The panel also shows all galleries and pictures, user activity and failed logins. Step by step instructions are included in the package (README.txt).
Step 3. Test the server
In the Windows command prompt:
curl -i -X POST -d "user=demo-user&pass=12345" "https://example.com/imgshow/list.php?dir=mix1"Response 200 with #private on the first line: the server works. Response 403: wrong login or password. Response 404: the gallery does not exist or is not allowed for this user.
Step 4. Add the gallery to the player
[My gallery: Mix1]
images   = https://example.com/imgshow/list.php?dir=mix1
user     = demo-user
password = 12345
save_dir = D:\Photo\Saved
One section per gallery, with the folder name at the end of the address after dir=. Select the gallery and click Rescan.
Method 3: Cloudflare R2 directly, without hosting
The player reads pictures directly from Cloudflare R2 cloud storage; no server
is needed at all. Cloudflare provides up to 10 GB of storage and outbound traffic
free of charge, with moderate pricing beyond that. This method suits a large public
gallery. Try the demo, it is already included in the player: S3D R2 images, gallery: Mix1, Mix2
Cloudflare R2
Step 1. Create a bucket and upload the pictures
In the Cloudflare dashboard, open R2 object storage and create a bucket. Inside it, create one folder per gallery, for example mix1, and upload the pictures to it.
Step 2. Allow or deny saving
Put a config.txt file containing a single line into the gallery folder:
Step 3. Create a read-only key
In R2 object storage, under Account Details, click Manage next to API Tokens. Permissions: Object Read only; bucket: only yours (Apply to specific buckets only); TTL: Forever; leave the IP filter empty. After the token is created, copy the Access Key ID and the Secret Access Key. The secret is shown only once. The Token value line is not used by the player; do not share it with anyone.
Step 4. Add the gallery to the player
In the dashboard the bucket address looks like this: https://<Account ID>.r2.cloudflarestorage.com/<bucket>. The section takes the Account ID, the bucket name and the gallery folder from it:
* The access key is stored in a text file on every viewer's computer. It is read-only and valid for this bucket only: files cannot be deleted or modified with it. Use this method only for public galleries; for private ones use Method 2.
Cloudflare R2
Step 1. Create a bucket and upload the pictures
In the Cloudflare dashboard, open R2 object storage and create a bucket. Inside it, create one folder per gallery, for example mix1, and upload the pictures to it.
Step 2. Allow or deny saving
Put a config.txt file containing a single line into the gallery folder:
save = 1save = 1: viewers may save pictures; save = 0 or no file: saving is not allowed. The permission is stored in the bucket, not on the viewer's computer, so viewers cannot change it.
Step 3. Create a read-only key
In R2 object storage, under Account Details, click Manage next to API Tokens. Permissions: Object Read only; bucket: only yours (Apply to specific buckets only); TTL: Forever; leave the IP filter empty. After the token is created, copy the Access Key ID and the Secret Access Key. The secret is shown only once. The Token value line is not used by the player; do not share it with anyone.
Step 4. Add the gallery to the player
In the dashboard the bucket address looks like this: https://<Account ID>.r2.cloudflarestorage.com/<bucket>. The section takes the Account ID, the bucket name and the gallery folder from it:
[My R2 gallery: Mix1]
images = r2://<Account ID>/<bucket>/mix1
key    = <Access Key ID>
secret = <Secret Access Key>
Select the gallery and click Rescan.
* The access key is stored in a text file on every viewer's computer. It is read-only and valid for this bucket only: files cannot be deleted or modified with it. Use this method only for public galleries; for private ones use Method 2.
Method 4: a public gallery listed in index.txt
The pictures are publicly available on any website, together with an
index.txt file that lists them. Neither a password nor a key is required.
Step 1. Create index.txt
One file name per line, relative to the folder that contains index.txt, or the full address of a picture. Lines starting with # are ignored.
Step 2. Add the gallery to the player
Step 1. Create index.txt
One file name per line, relative to the folder that contains index.txt, or the full address of a picture. Lines starting with # are ignored.
save = 0
photo1_x.jpg
photo2.mpo
sub/photo3.heic
https://other.site/pic_p.jpg
save = 1 allows viewers to save the pictures; without this line saving is not allowed.
Step 2. Add the gallery to the player
[Public gallery]
images = https://example.com/gallery/index.txt
Select the gallery and click Rescan. The pictures are shown in the order given in index.txt.
Viewing
PreviewsPreviews are loaded only for the cards visible in the window. When you scroll further, the next ones are loaded. Finished previews are kept in a disk cache and appear instantly the next time. For 3D pictures the preview shows the left view.
Slide show
Clicking a card starts a slide show from that picture. The pictures then follow in a loop, in the same order as in the window.
Sorting
Newest and Oldest: by file date. Name: by name, with numbers compared by value: 1, 2, 3 ... 10 ... 1000. This is convenient for numbered series.
Remote galleries
Pictures from a server, R2 or index.txt are not written to disk when saving is not allowed. The player keeps the current picture, the next 10 and the previous 3 in memory, so browsing runs without delays.
Saving pictures
If the gallery allows saving, the window header shows a Save checkbox. When it is checked, every picture loaded for the slide show is also written to disk: to the save_dir folder of the gallery section or, if none is set there, to the general save_dir. Files that already exist in the folder are not overwritten.Who decides whether saving is allowed:
Your own server: the server owner, with the save option of each user in the admin panel.
Cloudflare R2: the bucket owner, with the config.txt file in the gallery folder.
Public gallery: the author, with the save = 1 line in index.txt.
The permission arrives together with the list when you click Rescan. Until Rescan is clicked, the window shows No save instead of the checkbox.
Troubleshooting
If the list is empty, the Media Manager window shows the reason.No cache: press Rescan
The gallery has never been loaded. Click Rescan.
Folder not found
The folder does not exist. Check the path in images.
No image files
The list was loaded but contains no pictures. Check the folder and the file extensions.
Wrong user or password
The server rejected the login or password. Check user and password.
Too many attempts, wait 15 min
Too many failed login attempts in a row. Wait 15 minutes.
Server not responding
No network connection, or the address in images is wrong.
Server error 404
The gallery does not exist on the server, or it is not allowed for this user (galleries of the user in the admin panel).
R2: HTTP 403 SignatureDoesNotMatch
The secret is wrong, or the computer clock differs significantly from the actual time.
R2: HTTP 403 AccessDenied
The key does not belong to this bucket or has no read permission.
R2: key or secret not set
The section has no key or secret line.
Index: HTTP 404
The address of index.txt is wrong.
Homepage
Terms & Conditions
About Us
Privacy Policy
Business Info
Contacts
Payment
Shipping
Send Msg
 S3D
00:00:00
Singapore 2026


