-
 en
en
Canon shutter adjustment tool
Shutter calibration
The tool is designed to work directly with the shutter mechanism of Canon cameras 5D Mark3. Used for troubleshooting repairs, quick adjustment of mechanics after repair or replacement. You can check the integrity of the nodes, assess the quality of their work, correctly configure tension of the springs of the mechanism to the original state of the parameters. It provides uniform exposure of the frame over the entire exposure range. Canon's factory default reference values are embedded in the software.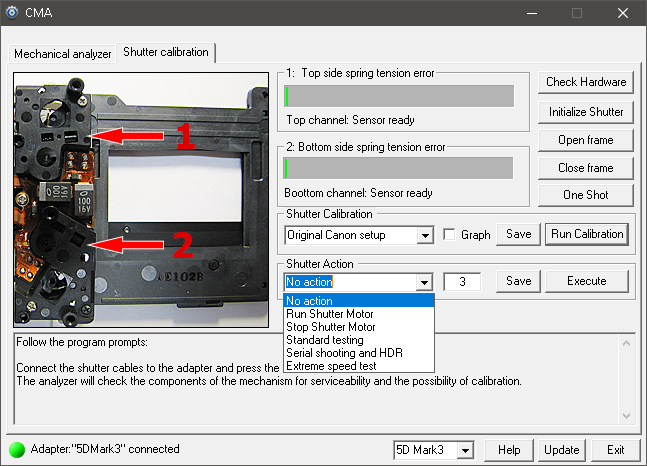
Button: Check Hardware
An automatic check of the health of the nodes is carried out:1. The integrity of the shutter motor.
2. Serviceability of optical shutter sensors .
3. Phase sensor of the mechanism position.
4. Integrity of electromagnets.
Button: Initialize Shutter
Armed the shutter and charges the release electromagnets. In manual mode press this button first. Otherwise, the opening will not work and closing the curtains. After finishing work, do not forget to reset both curtains, so that the springs of the mechanism do not weaken during long-term storage.Button: Open frame
Opens the shutter window. Manual lower curtain release.The sync signal is available on pin H7 on the PCB adapter.
Button: Close frame
Closes the shutter window. Manual lower curtain release.The sync signal is available on pin H8 on the PCB adapter.
Button: One Shot
The shutter is armed and a single release is performed. From pins H7, H8 of the adapter board you can remove the synchronization signal and see the passage of control pulses electromagnets and the operation of optical sensors with an oscilloscope.Control group: Shutter Calibration
Here is the selection of the spring tension and comparison with the factory settings. You should choose in the combo-box which sample you need to configure:1. Original Canon setup
This is the original factory setting of the new camera.
2. The most accurate
This is a mathematically correct setting based on theoretical calculating the operation of the mechanism.
From pins H7, H8 of the adapter board, you can remove the synchronization signal for oscilloscope and see the passage of electromagnet control pulses, operation of optical and phase sensors.
After pressing the button Run Calibration parameters are being measured exposure and compare with the selected setting. Results are displayed in text form in the message box. On line indicators Top/Bot side spring tension error the amount of deviation from exemplary settings and recommendations in which direction to tighten the springs. If now go to the 1st tab of the Mechanical analyzer program, then you can see timing diagrams of digital outputs of optical sensors.
By taking measurements and adjusting the springs several times, you will quickly and accurately adjust medium exposure shutter. The work results can be saved pressing the button Save. Then look at the report files in the program directory.
Control group: Shutter Tests
After calibration, a shutter performance check should be performed for short exposures and serial shooting. This will ensure that there are no disruptions and even exposure of the frame in the entire range of shutter speeds.In the combo-box select the required check mode:
1. Standard testing
Performs sequential shutter releases on all standard durations described in the documentation for the camera. Number of operating cycles can be set in the Edit Box next to the mode selection. Taking this test will be enough for an ordinary user's camera.
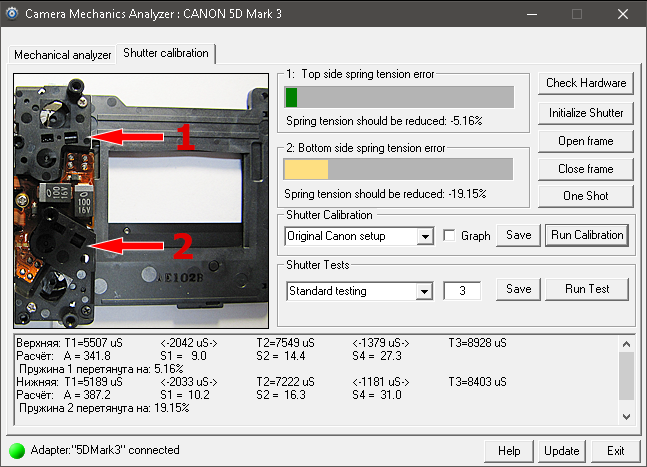
In this picture you can see the result of the test. The software calculate how much the spring tension differs from the factory setting. In this case it is necessary to weaken spring 1 by 5%, spring 2 by 19%.
2. Serial shooting and HDR
A set of procedures honed for fast burst or HDR shooting is performed. Selection of reliable valves for high-speed conditions. Sports, reportage, etc cases.
3. Extreme speed test
A set of procedures is performed to determine the maximum achievable boundaries the speed of the mechanism and its stability. In this mode, it is possible mechanical overload of parts, if you notice anomalous behavior of the shutter, stop the test immediately by pressing the button Stop.
After pressing the button Run Test measurement, averaging and recording in progress cycle parameters. Then there is a comparison with the reference data of the mechanism. The results are displayed as text in the message box. If it will be a deviation of more than +/- 5% from the ideal is detected, the program will give recommendations which should be further checked. The results of the work can be save by clicking the button Save.
Tool assembly
The tool consists of 2 parts.USB adapter
Shutter adapter board
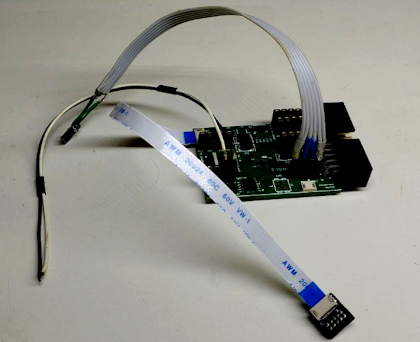
They are connected by a wide flat cable. From the PCB of the Shutter Adapter, thin wires can be used to connect the required shutter. Connect the USB Adapter to the computer and to a power source. Any power supply from 10 volts to 16 volts with a current higher than 500mA can be used.
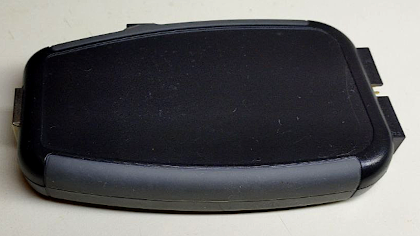
Assembled tool

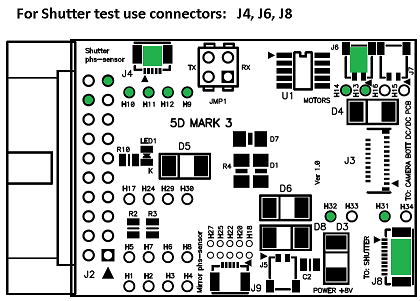
Shutter connection
Order and use our USB controller + adapter. The software will not be able to work without it. In the figure below, the green rectangles indicate the connectors for connection shutter. Green ovals - control points for external measuring appliances, if necessary. You can connect extension cables to them, so that it is convenient to work with the shutter directly in the camera. 15cm cables are included with the adapter. The pictures below show the connection of the shutter to the adapter for the Canon 5D Mark3.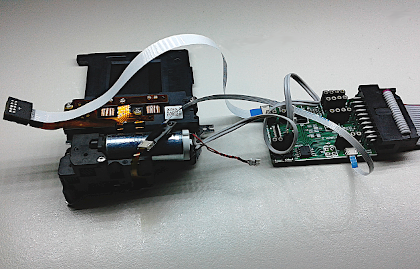
Documentation
A detailed electrical diagram is included with the tool upon purchase. In the program directory you can find a chm file, which describes the configuration of the connection to the camera and the function of the buttons. The description is available when the button is pressed Help.
The application does not automatically check for new updates, if you wish, you should do it yourself. Description and example of shutter repair: Canon 5D Mark3 Err 20
Additional components
You need have a USB-controller + shutter adapter board. Download the software "CMA.exe". If you use specific connectors for shutter or motors connection, make or buy adapters in advance. Ask support what connectors you may need for your case.
How to buy
1. You can buy a fully assembled, ready-to-use unit in a plastic case.Price: $100 USD
2. You can buy a set of parts and PCB for self-assembly. The kit includes already programmed processor.
Price: $60 USD
3. You can buy a set of empty PCBs.
Price: $10 USD
4. You can buy only programmed processor.
Price: $10 USD
Use PayPal. Write a request to the 'sales' with the delivery address and desired configuration. Or send Telegram msg.
Conditions of shipment
Downloads
Application:
CMA exe (Win)
Device doc:
USB Adapter sch
Shutter adapter sch (5DM3)
Device driver:
USB D2XX driver
USB driver installation help
Device fw update: ver1.2
Firmware file
Circuits and chips:
5D Mark3 shutter controller sch
5D Mark3 motors chip BD65493FV
CMA exe (Win)
Device doc:
USB Adapter sch
Shutter adapter sch (5DM3)
Device driver:
USB D2XX driver
USB driver installation help
Device fw update: ver1.2
Firmware file
Circuits and chips:
5D Mark3 shutter controller sch
5D Mark3 motors chip BD65493FV
Homepage
Terms & Conditions
About Us
Privacy Policy
Business Info
Contacts
Payment
Shipping
Send Msg
Singapore 2026


